Pauline
What is Pauline?
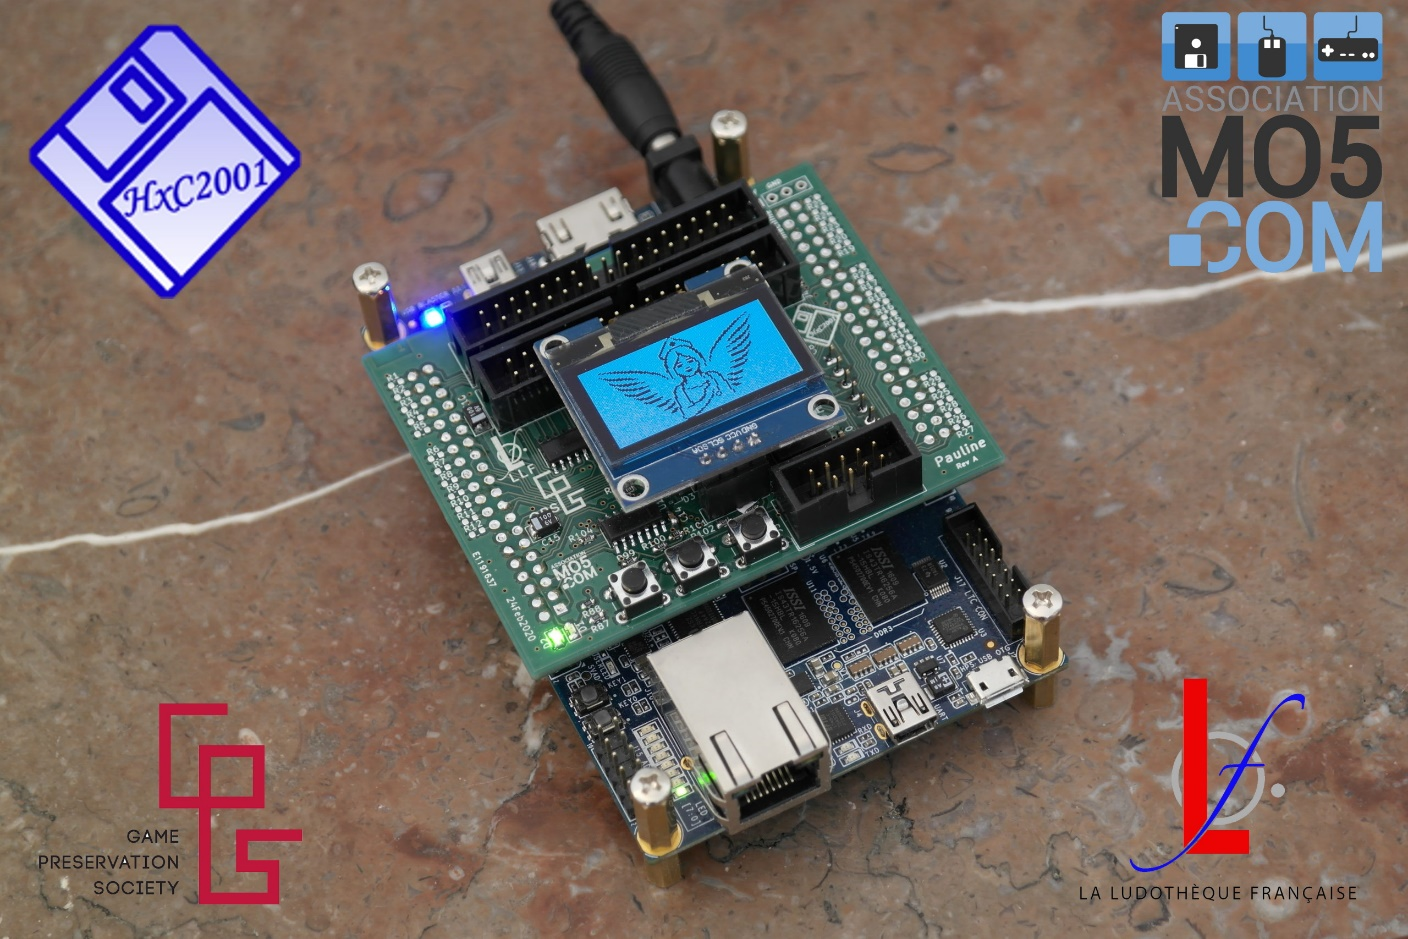
Pauline is a tool developed by Jean François Del Nero – who also designed the very famous HxC device – within the association La Ludothèque Française, in partnership with the Game Preservation Society located in Japan and the MO5.COM association located in France. Pauline is entirely open-source. It's a powerful, universal and simple-to-use tool that will allow you to accurately scan the contents of the magnetic floppy disks you want to archive, regardless of their format. Finally, Pauline is based on a commercially available hardware solution, a DE10-Nano FPGA board and a daughter board whose schematics and BOMs are published on the SourceForge site, as well as a software solution that is also open-source and also available on Pauline's SourceForge page.
Pauline, whose name actually refers to the assembly consisting of a DE10-Nano board with its daughter board 'Pauline', will interface with your floppy disk drives, whatever their formats (3", 3.5", 5.25", 8" or others) and will allow you to scan their content and archive it with just a few clicks.
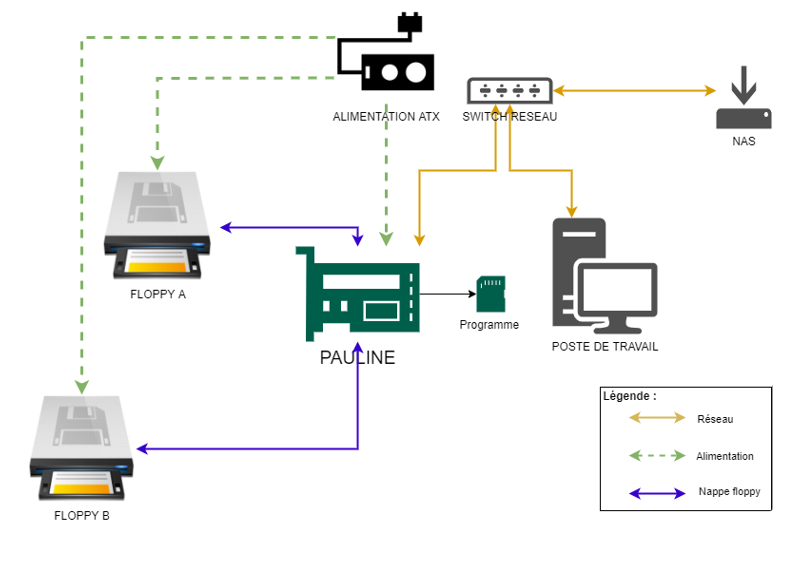
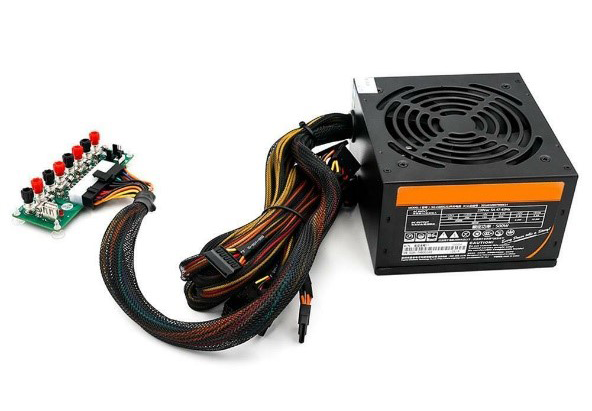
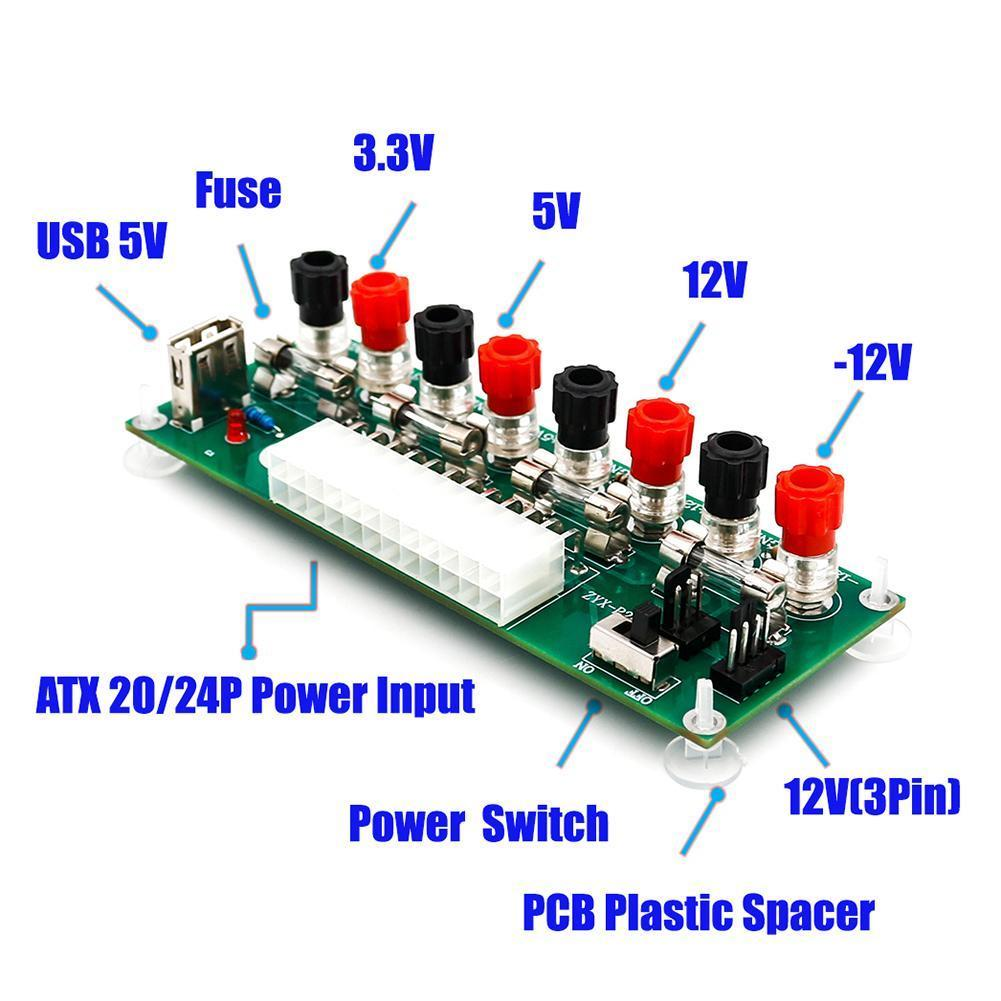
Your Pauline will therefore interface with several floppy disk drives of various formats. It is important to note here that, as shown in the diagram above, we recommend that Pauline and the floppy disk drives share the same power supply (by default, a modern ATX-type PC power supply), in order to minimize any possible problems relating to differences in electrical voltage (common ground). In order to easily connect all these items to an ATX power supply (choose quality over power, of course), there is a small device available on the market that will allow you to link all your floppy drives and your Pauline to the same power supply easily:
What are the components of Pauline ?
Pauline is a set of several technical and software elements that will allow you to accurately scan your magnetic disks, whatever their format. To efficiently work in an autonomous way, out of sync with a conventional computer, Pauline makes use of a technical platform known as the DE10-Nano which we will briefly present :
THE DE10-NANO
The DE10-Nano is an electronic board built around a high-performance fifth-generation FPGA chip and two ARM cores capable of running an OS (Linux or other). It is also equipped with an HDMI output (not yet used at this stage of the project), an RJ45 Gigabit network socket, USB connectors and GPIO (General Purpose Input/Output) connectors capable of receiving various electronic boards and of communicating with the outside world.
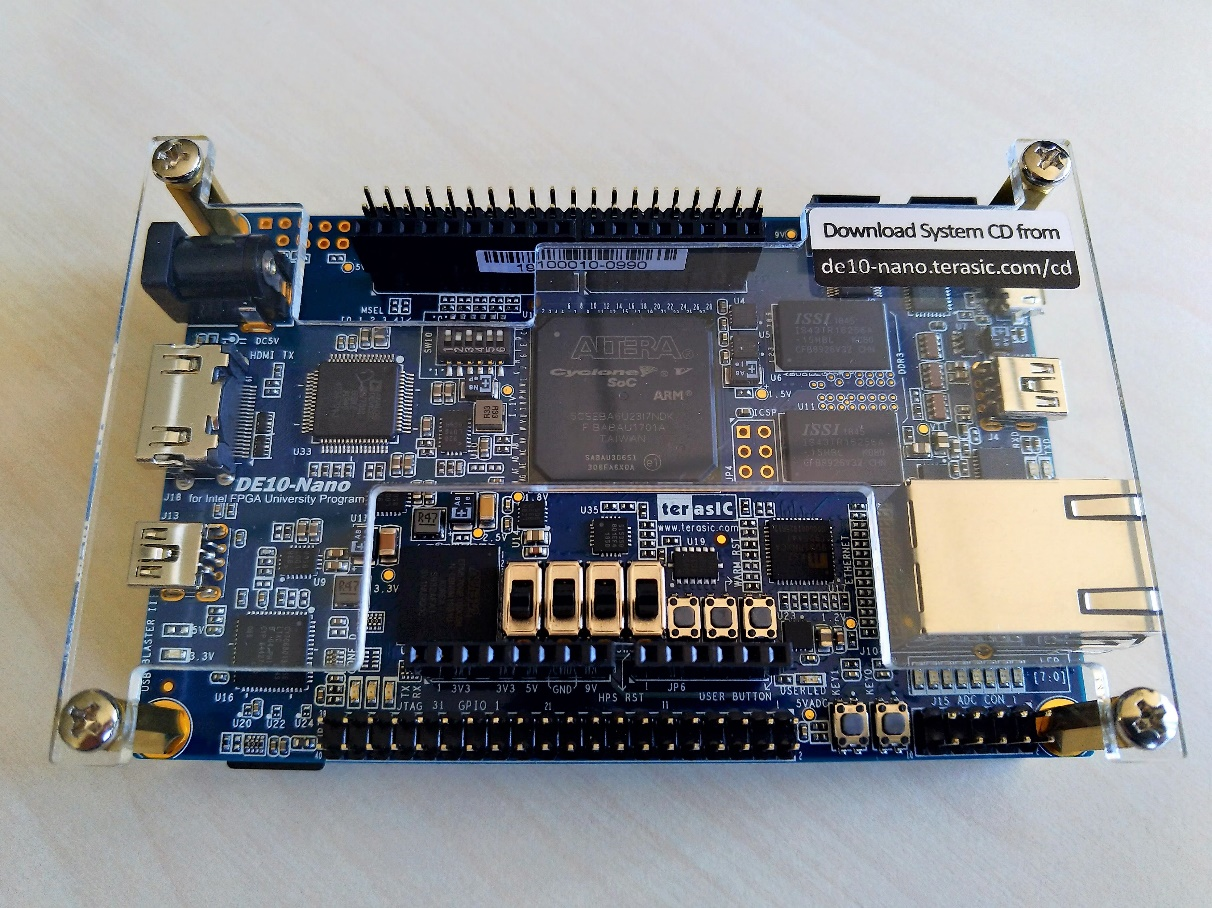
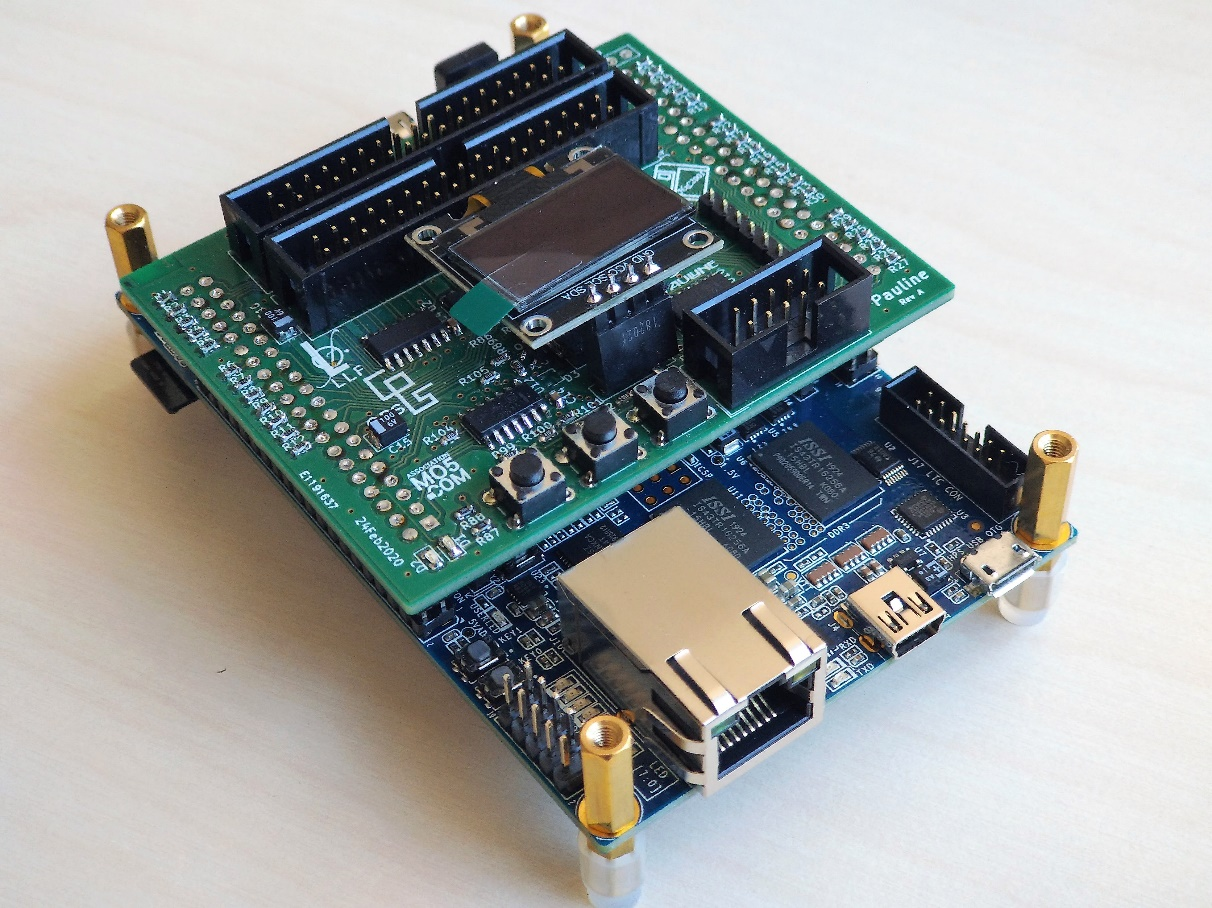
This board is available for around €130 depending on the merchant sites (public prices as of July 2020), for instance from Digi-Key Pauline is therefore, as you will have understood, a daughter board that will be grafted onto the DE10-Nano board, directly to the GPIO connectors located at top and bottom on the picture above.
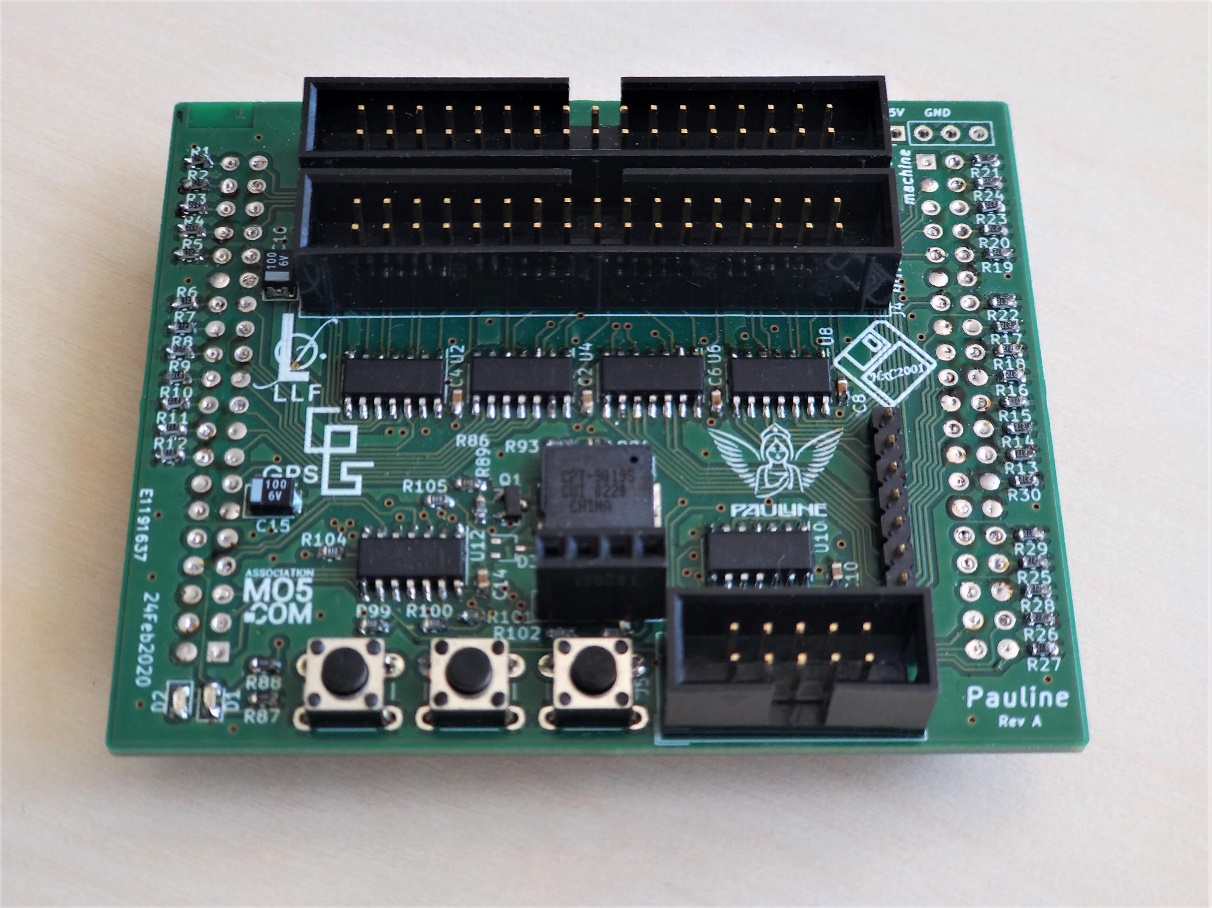
THE PAULINE BOARD
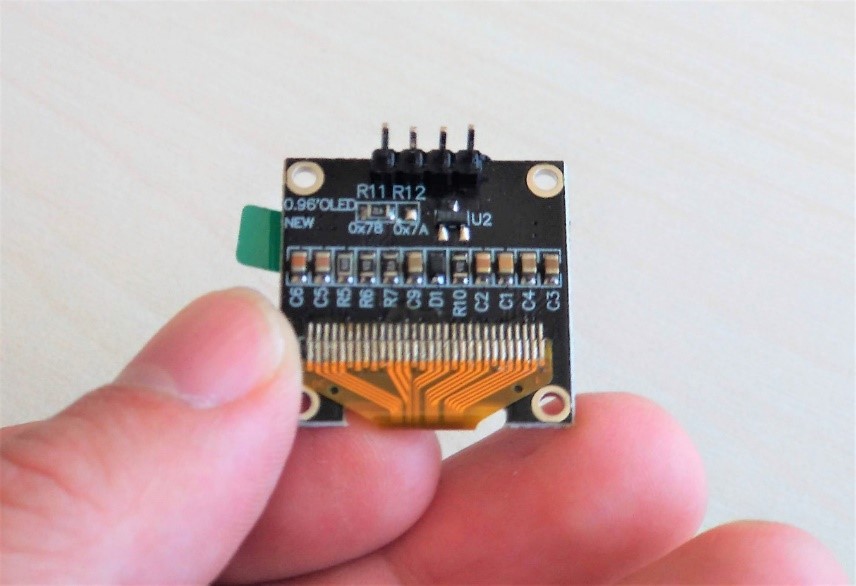
The Pauline board sports several connectors that will let it control up to 4 floppy disk drives using the Shugart data format. A 4-pin connector located in the center allows the use of a small 0.96 inch OLED screen which will help make an immediate diagnosis of Pauline and the operations in progress. Finally, three buttons will also make it possible in the future to quickly interact with Pauline's functionalities.
Pauline's assembly
Now that you have received all the parts necessary for Pauline to operate, we will see together how to arrange them in order to start Pauline. Don't hesitate to ask for help again on the Discord of La Ludothèque Française or MO5.COM if you encounter any difficulty (see last chapter of this document).
PREPARING ALL COMPONENTS
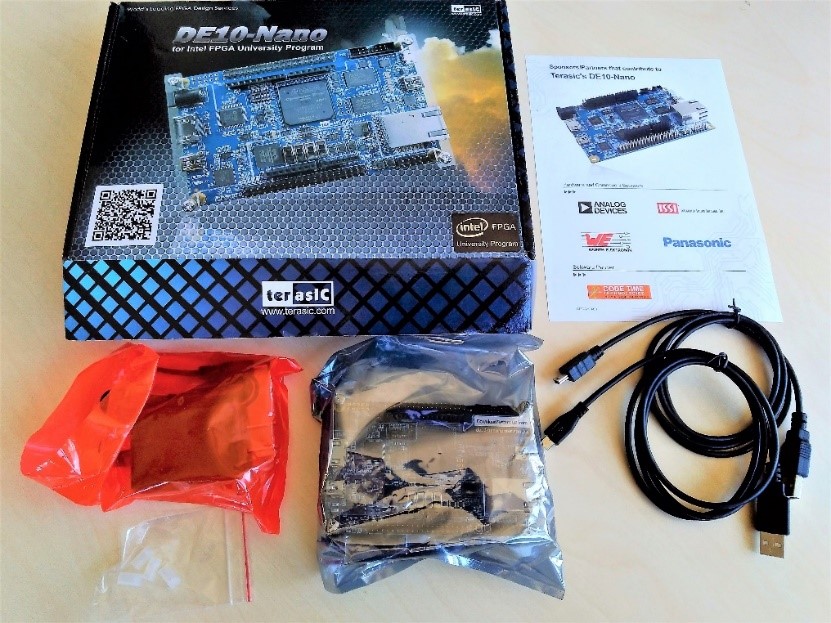
First check that you have received a complete DE10-Nano board, including the board itself, USB power supply, manuals and necessary cables, as shown here:
Then, take out its power supply and add an adapter for your country's electrical outlets. Note that you can use any 5V USB power supply but with a minimum output of 2 amps.

The DE10-Nano board looks like this once removed from its protective packaging:
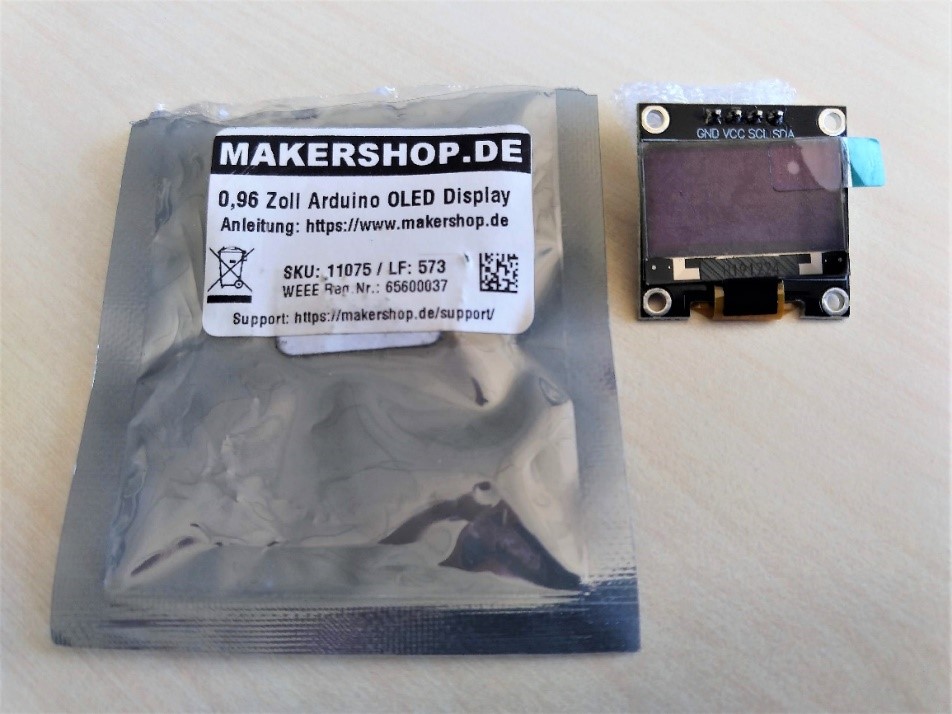
The additional OLED screen that we suggest you purchase looks like the one below. It's an OLED SSD1306 screen with I2C interface, 128×64 and 0.96″. Note this reference and seller if you wish.
ASSEMBLING THE PAULINE BOARD ON TOP OF THE DE10-NANO
Carefully hold the Pauline daughter board between two fingers and present it above the DE10-Nano board like so:

Then make sure that the connectors of the daughter board are correctly facing the connectors of the DE10-Nano board:
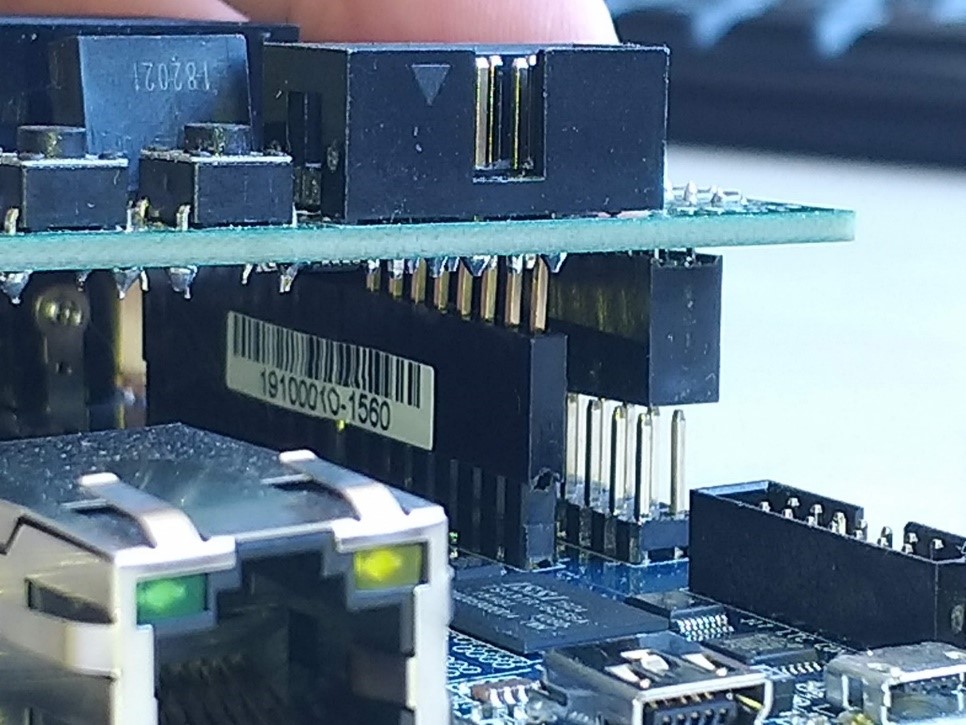
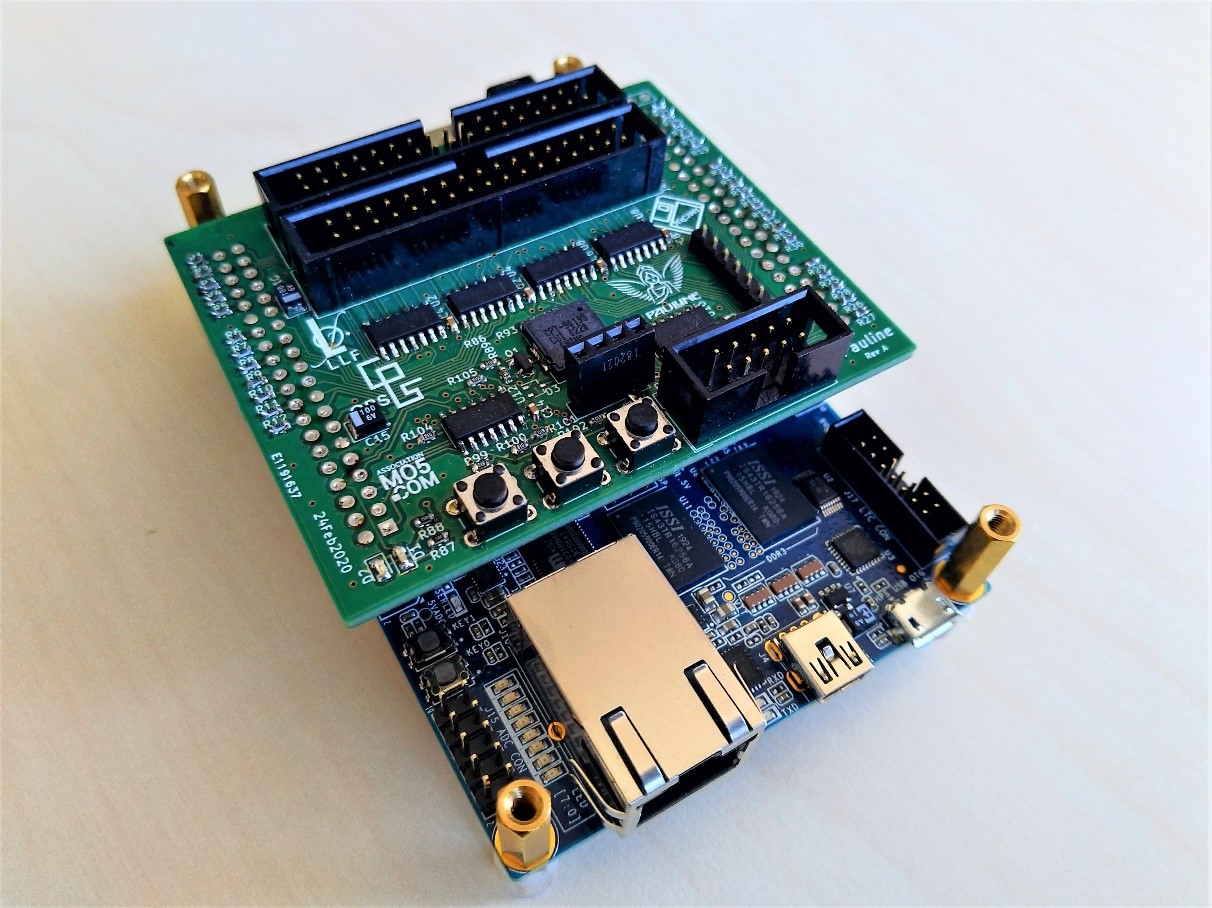
You should get the following setup:
ASSEMBLING THE OLED SCREEN
The optional OLED display is very easy to set up, and needs only 4 pins to connect to Pauline.
Hold the screen between two fingers and slide its pins into Pauline like this:

Congratulations, your Pauline is now complete!
Preparing the MicroSD card containing the firmware
The DE10-Nano board comes with an 8GB MicroSD card. This capacity is more than enough for Pauline's work. However, it needs to be formatted with the Linux work environment prepared for Pauline and her operating tools. First of all, get Pauline's latest firmware from Jean-François Del Nero's website:
https://hxc2001.com/pauline/
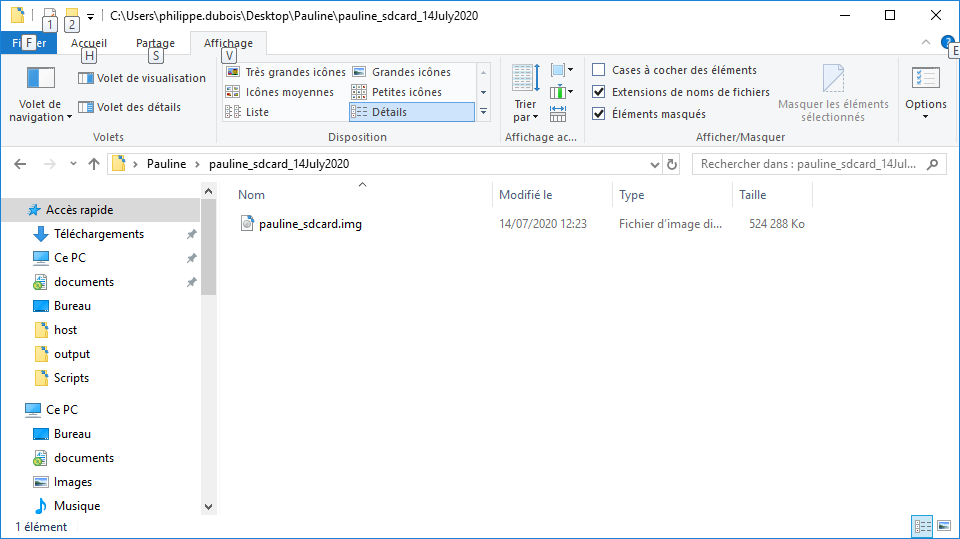
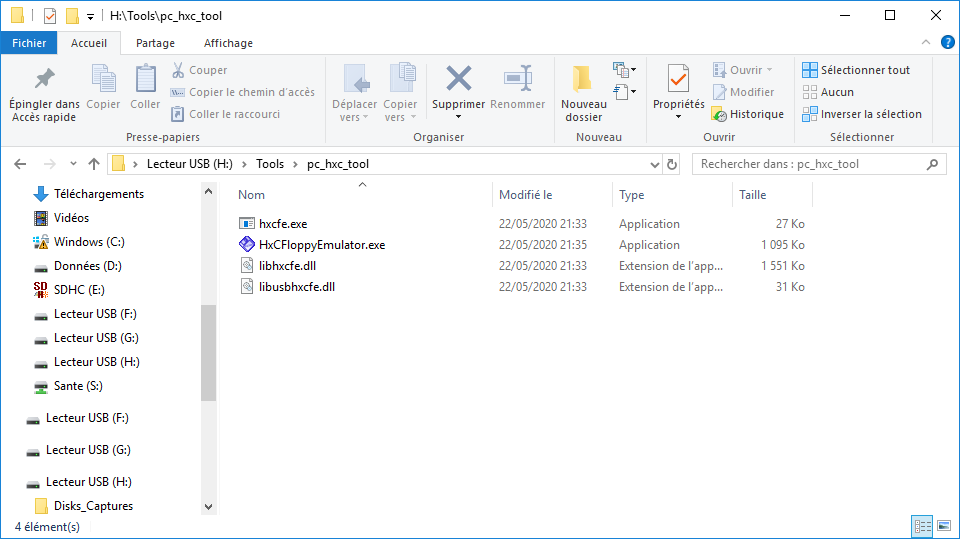
Unzip the file into a directory, which should give you access to the following file:
Use a tool to transfer the ISO image to a USB key (Win32DiskImager, Rufus, DD under Linux, …).
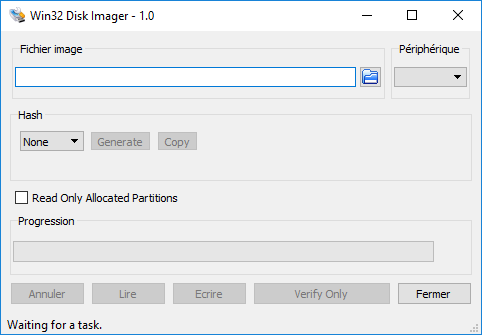
If you're a Windows user, download the free Win32DiskImager tool.
Proceed with the installation and then launch the tool. The following window should appear:
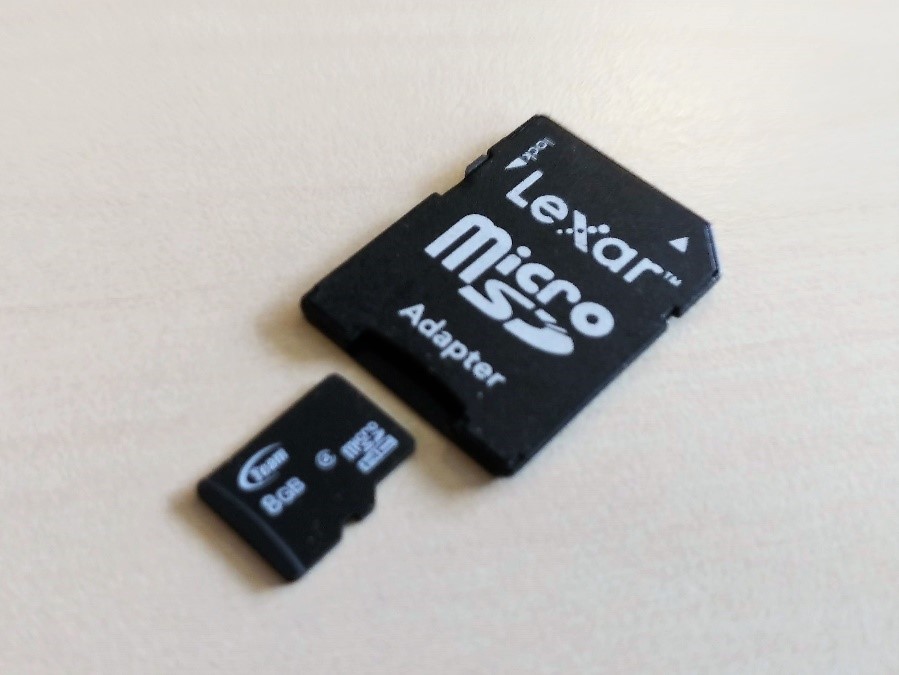
Insert the MicroSD card into your computer; if you don't have a special slot for this, you can use for example this MicroSD to SD adaptor:
Then, select the Pauline's firmware file you've just unzipped in Win32 Disk Imager
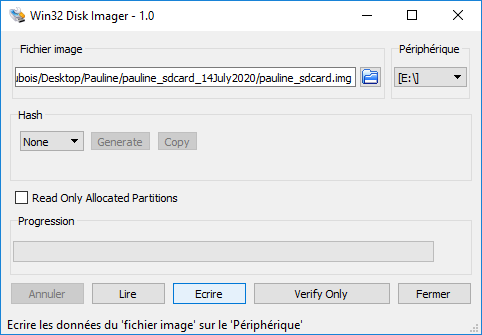
Press the "Write" button and wait until the operation is complete, upon which you should get a "Write successful" message.
The card will then contain several partitions (fat16, ext2 and fat32) with some folders.
During the next update, the partition dedicated to the saving of .hxcstream files will not be erased. Still, it is advisable to make a backup of the "Disks_Captures" folder in case of problems with the microSD card.
Then insert the updated MicroSD card into the DE10-Nano board as follows:
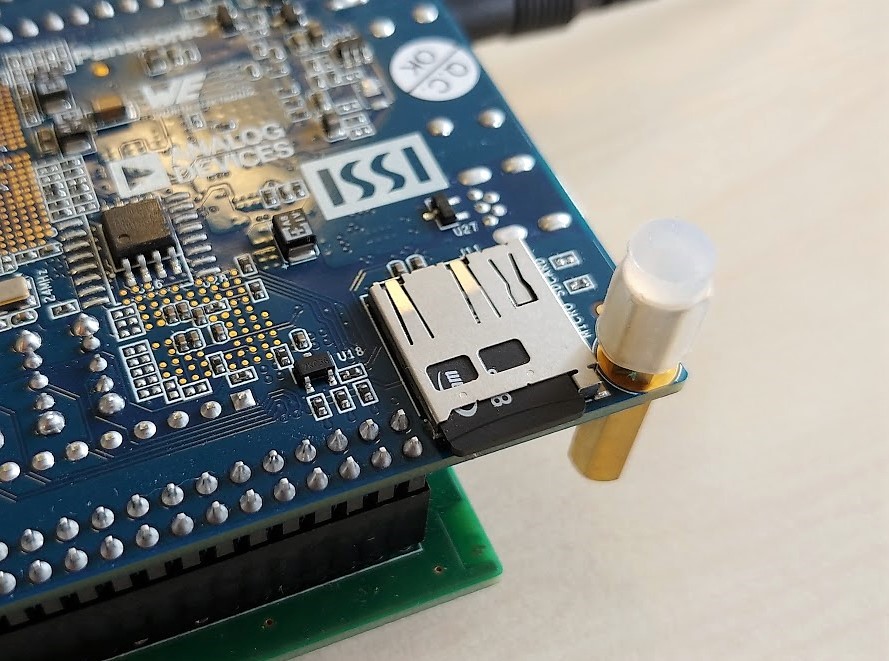
Push the MicroSD card in its holder with the tip of your fingernail, for instance, until you feel a click.
Pauline's first launch
The assembly of your Pauline is complete ! It's time to turn it on and let it wake up for the first time. Make sure you have inserted the MicroSD card updated with Pauline's firmware, then connect the power supply of the DE10-Nano board.
After a few seconds, you should hear a short beep and get the following display:
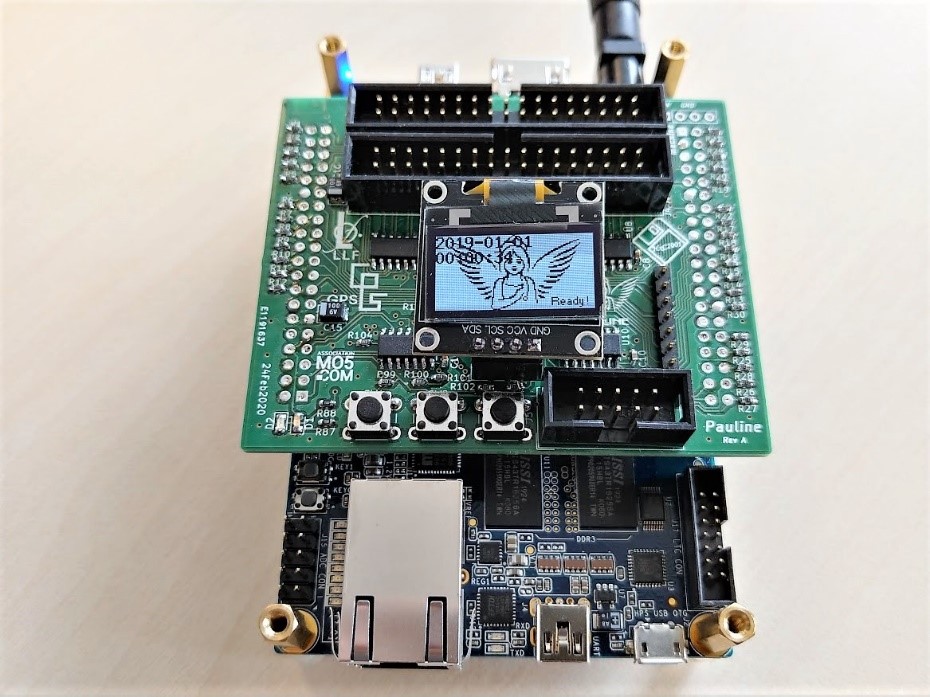
Your Pauline is ready and functional, congratulations!
Let's now configure it to work on your network and with your floppy drives.
Test procedures
Before starting to use Pauline, it is important to check that everything is correctly installed on the board.
For this we will rely on the board's internal test procedure. To run it, we will need to use the command line with a communication software: Putty
If you do not wish to install all the software that makes up the Putty package with "Windows installer", a version without installation is available
You can also download only Putty.exe, as we don't need anything else for this procedure.
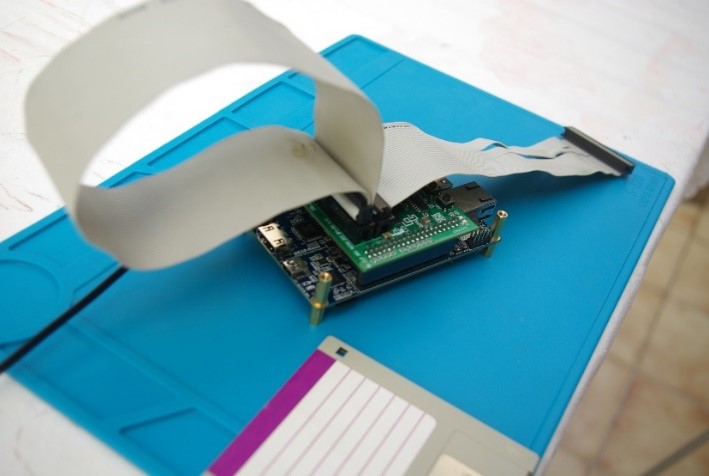
Connect a straight floppy cable between the J3 (host) and J4 (drives) connectors.
See the appendices for some information on ribbon cables.
Plug a network cable so that Pauline gets an IP address.
Turn Pauline on, and the IP address will be displayed on the OLED screen, e.g. 192.168.1.28
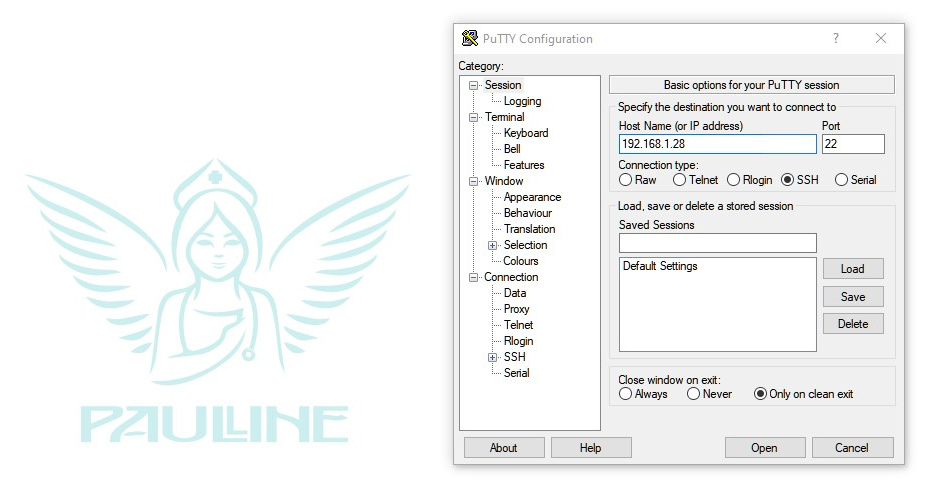
Launch Putty
In Putty, fill in the IP address and Port fields.
Example:
IP address: 192.168.1.28
Port: 22
Tick "SSH"
As a reminder, here are the default usernames and passwords used to connect to Pauline:
-
SSH (Login/pwd :
pauline/pauline, Login/pwd :root/root) -
FTP (Login/pwd :
pauline/pauline, Login/pwd :root/root) -
Samba / Windows shares (Login/pwd :
pauline/pauline)
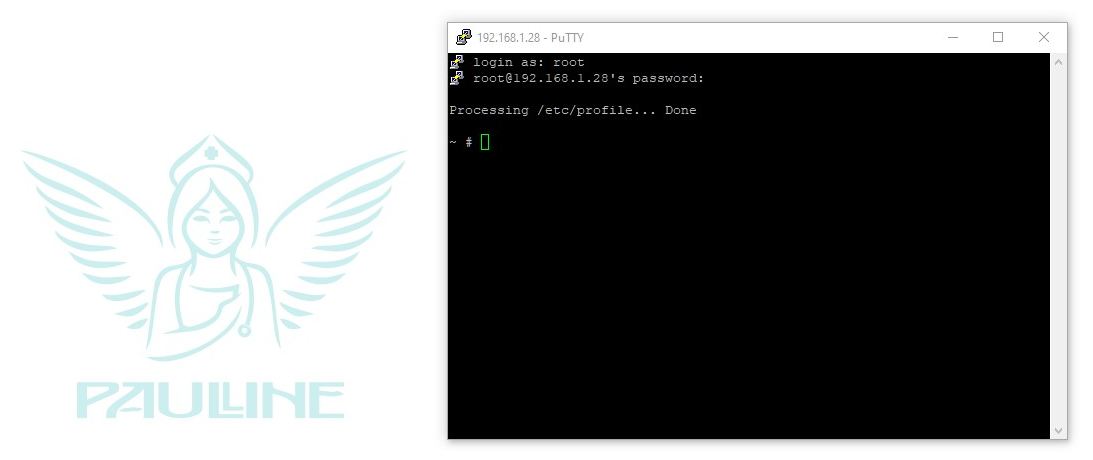
Click the "Open" button
A terminal windows opens: login as :
Type root and root as password
(The password is not displayed while typing)
First test
Type pauline -test_interface
The test will check the floppy interfaces, the leds, the buzzer, the additional IO port.
~ # pauline -test_interface

HxC Floppy Emulator : Pauline floppy drive simulator / floppy drive dumper control software v1.0.0.0
Copyright (C) 2006-2020 Jean-Francois DEL NERO
This program comes with ABSOLUTELY NO WARRANTY
This is free software, and you are welcome to redistribute it under certain conditions;

Host -> Floppy test
(00) OK !
(03) OK !
(13) OK !
(14) OK !
(15) OK !
(17) OK !
(22) OK !
(26) OK !
(27) OK !
(28) OK !
Floppy -> Host test
(01) OK !
(02) OK !
(04) OK !
(05) OK !
(06) OK !
(07) OK !
(08) OK !
(09) OK !
(10) OK !
(11) OK !
(12) OK !
(16) OK !
(18) OK !
(19) OK !
(20) OK !
(21) OK !
(23) OK !
(24) OK !
(25) OK !
(00) (0x1) 0x1   (0x1|)0x1 (0x2|)0x3 (0x4|)0x5 (0x8|)0x9    0xF
(01) (0x2) 0x2   (0x1|)0x3 (0x2|)0x2 (0x4|)0x6 (0x8|)0xA    0xF
(02) (0x4) 0x4   (0x1|)0x5 (0x2|)0x6 (0x4|)0x4 (0x8|)0xC    0xF
(03) (0x8) 0x8   (0x1|)0x9 (0x2|)0xA (0x4|)0xC (0x8|)0x8    0xF

1 -> 1
0 -> 0
PB1:1 PB2:1 PB3:1 INT:1
You'll have a few seconds towards the end to test the buttons: Press the buttons then to switch the PBx to zero.
The LEDs should flash during the first part of the test, and the buzzer should "beep".
Check that the IO part returns the following:
(00) (0x1) 0x1   (0x1|)0x1 (0x2|)0x3 (0x4|)0x5 (0x8|)0x9    0xF
(01) (0x2) 0x2   (0x1|)0x3 (0x2|)0x2 (0x4|)0x6 (0x8|)0xA    0xF
(02) (0x4) 0x4   (0x1|)0x5 (0x2|)0x6 (0x4|)0x4 (0x8|)0xC    0xF
(03) (0x8) 0x8   (0x1|)0x9 (0x2|)0xA (0x4|)0xC (0x8|)0x8    0xF
Second test (optional)
If everything is OK, you have the possibility to check one last aspect on your board
This test is optional as it requires some hardware and electronic skills - see the appendix for the procedure.
Everything is OK, let's now move on to the next step: configuring Pauline's interfaces.
Configuring the floppy disk drives connected to Pauline
Depending on the type of drives connected to Pauline (Shugart or PC Drive), parameters for the MOTOR_LINE and SELECT_LINE commands need to be set up.
See the appendices for how the connectors are assigned depending on their positions on the 34-pin floppy cable.
Access the contents of the SD card by inserting it in an external reader, by FTP or by SAMBA network sharing
(see above for login and password)
In the \pauline\Settings folder
Edit the drives.script file
If you are using "Shugart"-type drives, this technology allows you to control up to 4 different drives and 1 motor at a time. The motor-on is common to all the floppy drives on the same bus.
If you are using "PC Drive"-type drives, Pauline allows you to control 2 drives: Drive A and Drive B.
Example with the use of a 3.5 inch PC drive
set DRIVE_0_DESCRIPTION "3.5-inch Floppy drive"
set DRIVE_0_SELECT_LINE DRIVES_PORT_DRVSA
set DRIVE_0_MOTOR_LINE  DRIVES_PORT_MOTEA
set DRIVE_0_MAX_STEPS   82
See the drives_script_base.txt file in the \pauline\Settings folder on the SD card for more information.
Operating Pauline
There are several ways to control Pauline
Web interface
By using Pauline's IP address in a web browser, you can connect to the http service.
HxCFloppyEmulator
Unzip the ZIP archive, find and edit the config.script file.
1st method
Change the default IP address to your IP address displayed on Pauline's screen.
In our example Pauline's IP is 192.168.1.28, so the line must be modified as such:
set PAULINE_DEFAULT_IP_ADDRESS "192.168.1.28"
Save the file.
2nd method in HxCFloppyEmulator
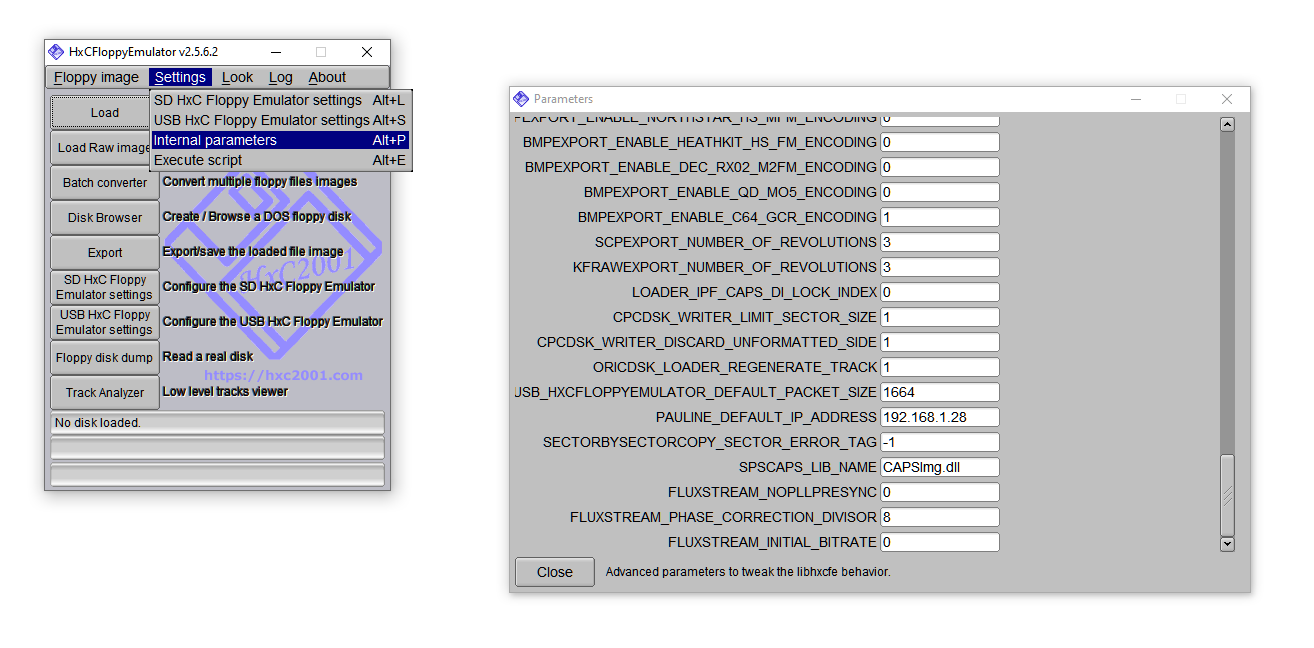
Launch HxCFloppyEmulator.exe.
Go to Settings, Internal Parameters
Edit the line PAULINE_DEFAULT_IP_ADDRESS => 192.168.1.28
Your first "dump" under HxCFloppyEmulator
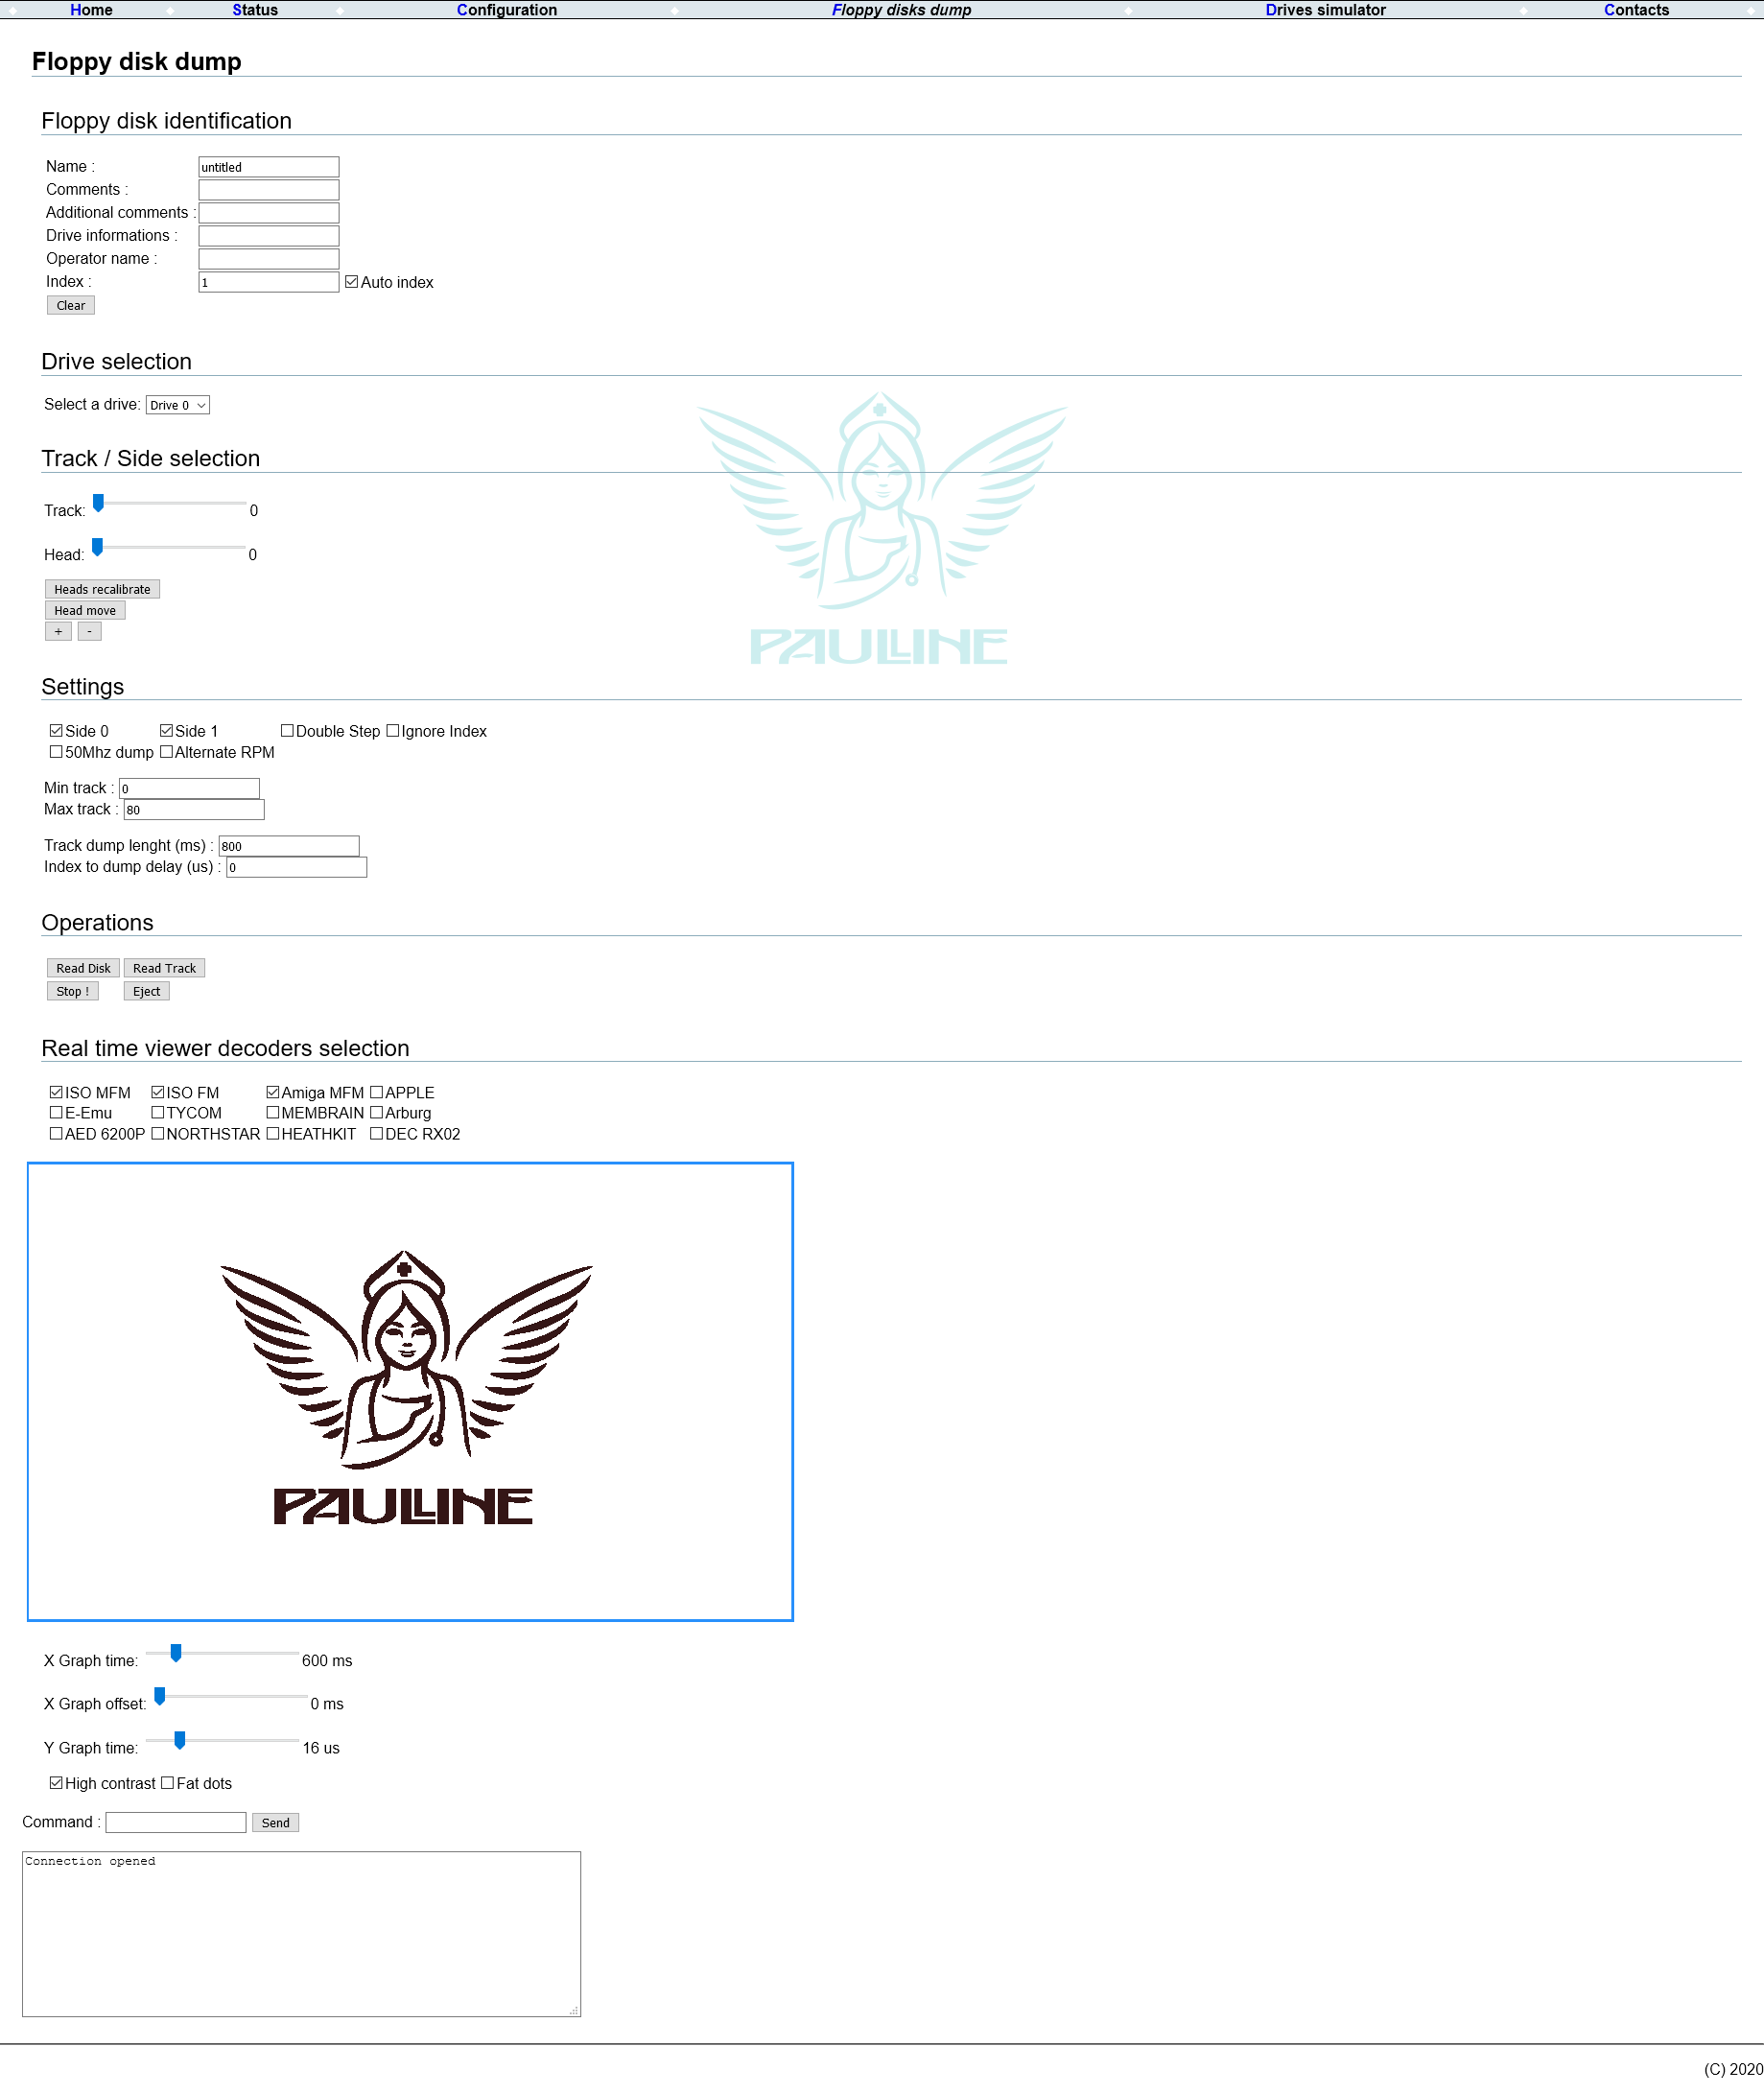
Launch HxCFloppyEmulator.exe.
Launch Ludo Floppy Disk Toolkit => Floppy image then Pauline control interface or shortcut keys ALT + P
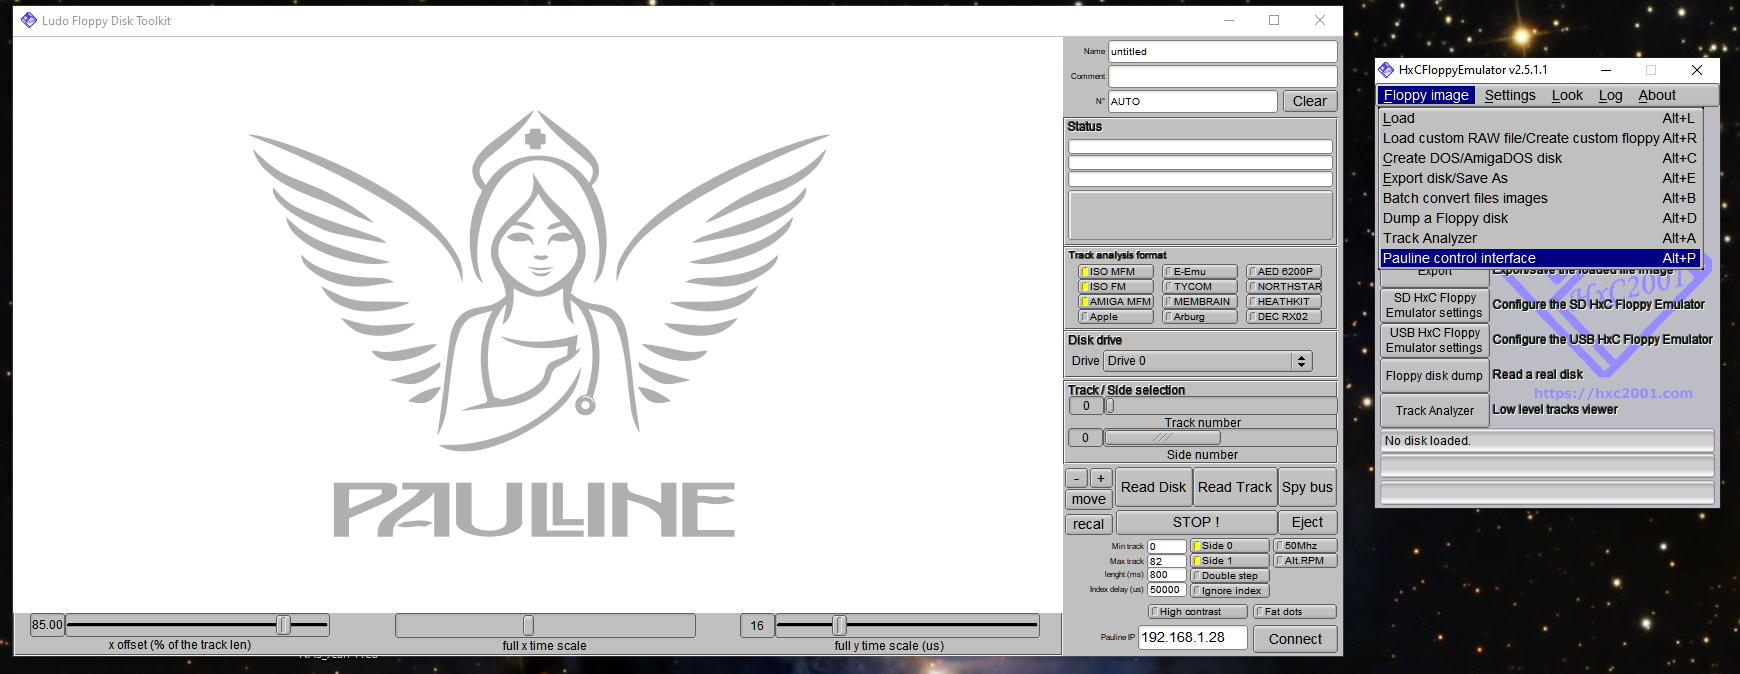
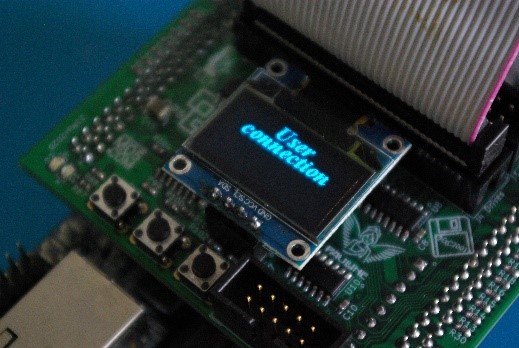
Check the displayed IP address, click on Connect,
Connected is displayed in the Status section
"User connection" should appear on Pauline’s oled screen
Choose the Disk drive number depending on the way your drive(s) are connected.
Click on recal; if everything is fine the floppy disk drive should perform a reset operation of the reading head (Heads recalibrate).
Using the Track/Side selection slider and the move button you can move the head to the desired location.
The Double step option lets you move the head to the next track or half track, as you wish.
(double step will allow you to scan 48tpi 40-track diskettes on a 5.25 inch drive)
Be careful not to exceed the physical capabilities of your drive.
Finally the stream dump…
Fill in the descriptive information of the disk (Name, Comment and No.).
Insert a floppy disk in the drive.
Press the recal button to be sure to start from side 0 / track 0.
Choose the track analysis format corresponding to the format of your floppy disk, to get a real-time visualization of the integrity of the data read.
Start the stream dump by pressing the Read Disk button. Reading then starts.
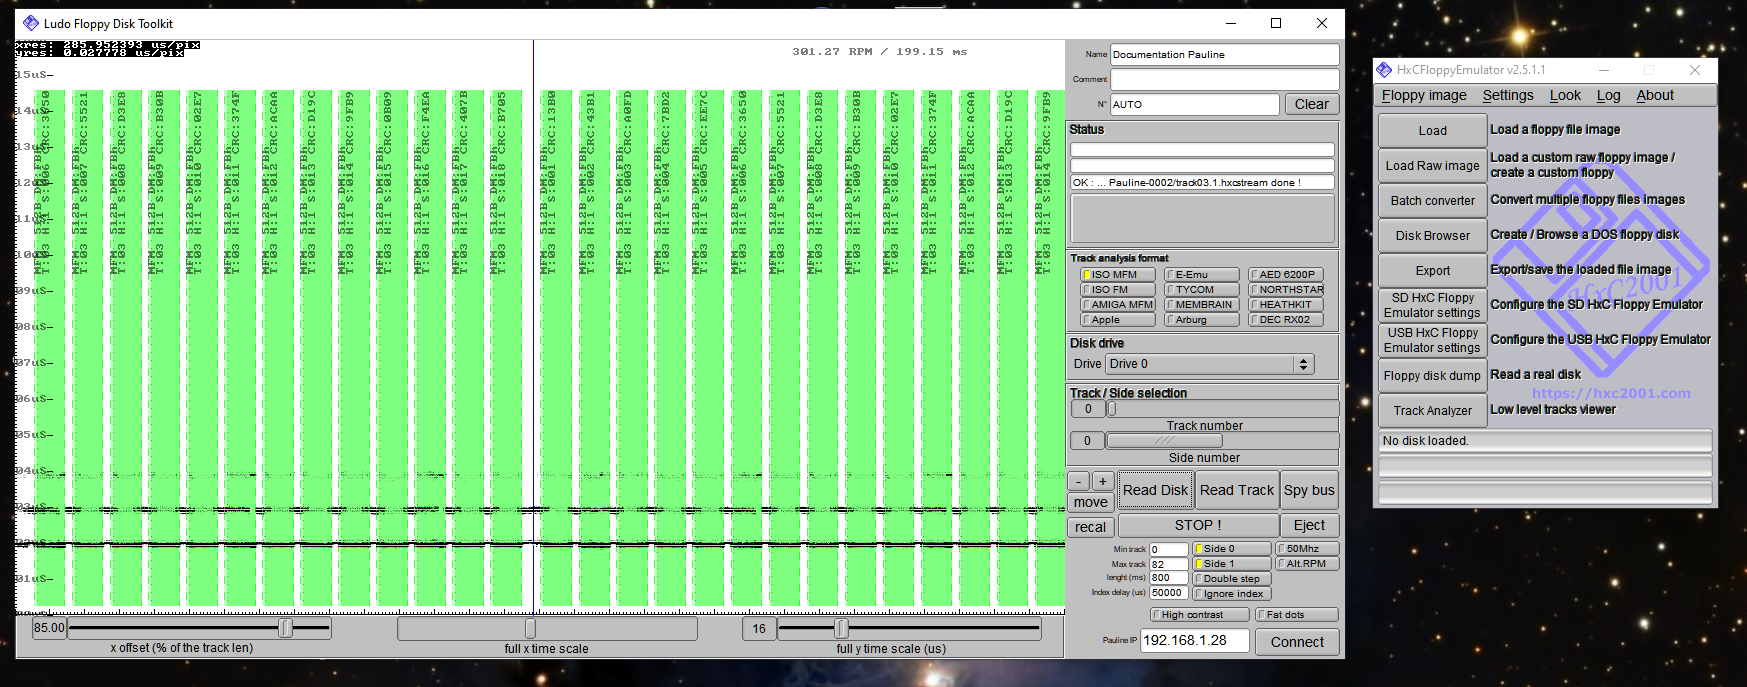
Green ... everything is fine!!
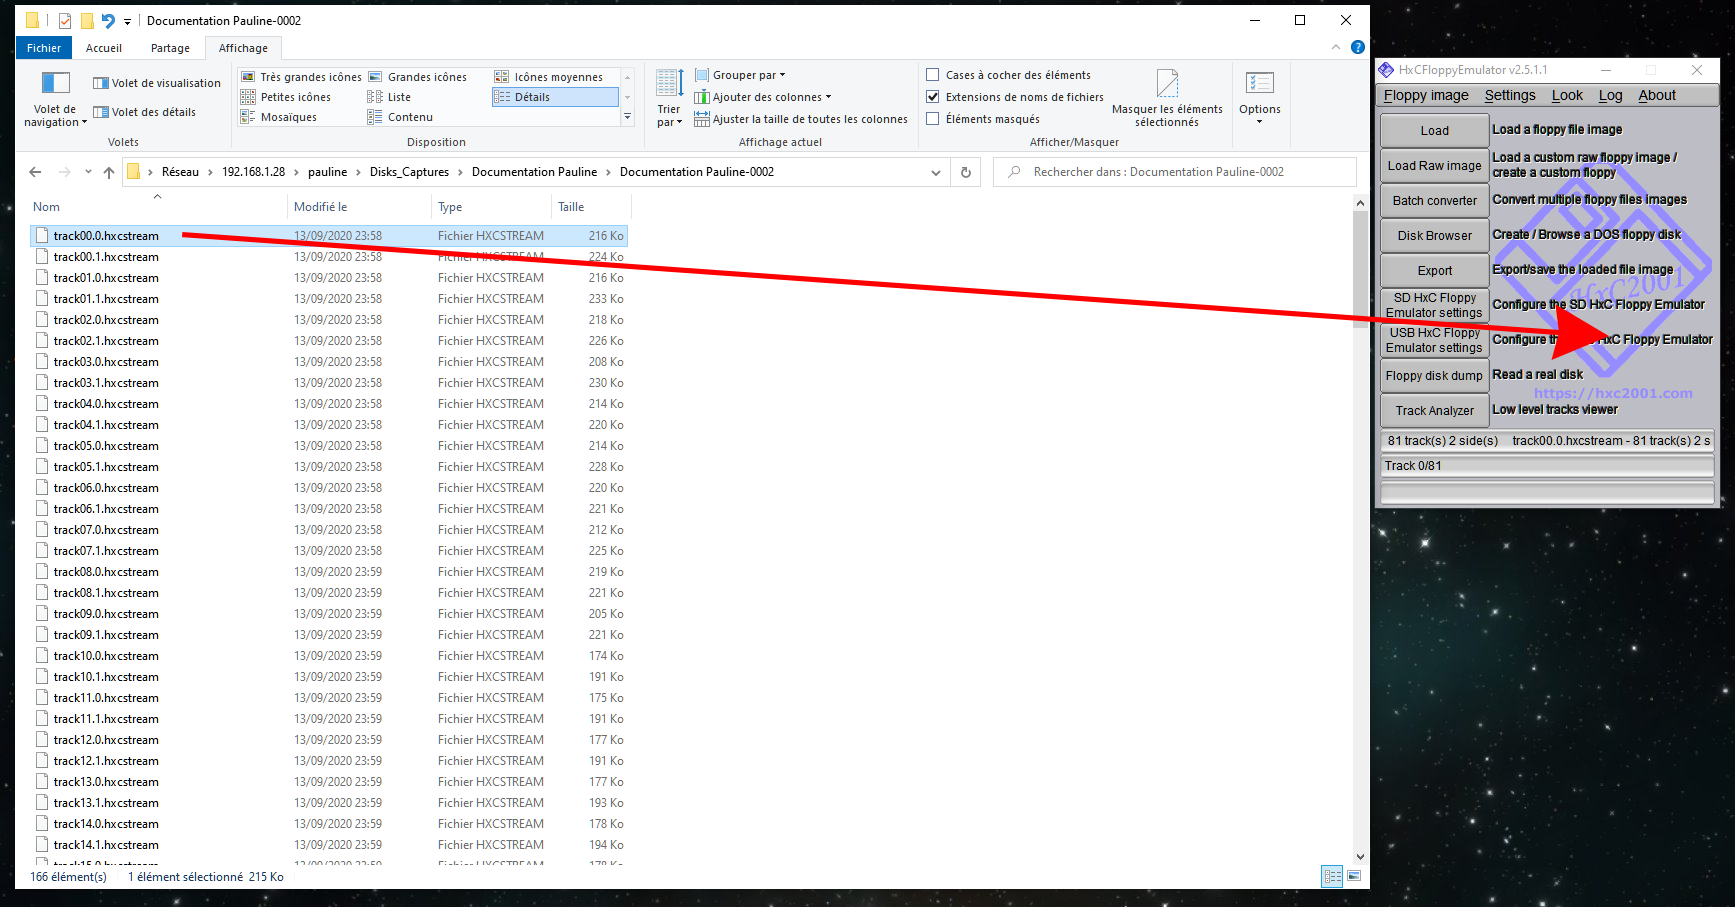
In the \pauline\Disks_Captures folder, a new folder has been created
with the name indicated in the Name section.
Inside this folder, one file per track and per head (side) has been created.
Example :
track00.0.hxcstream = track 0 side 0
track00.1.hxcstream = track 0 side 1
If you drag and drop the first file (track00.0.hxcstream) on the HxCFloppyEmulator.exe application, an analysis of the files starts – after a few seconds or more depending on the number of tracks read and the power of your computer.
If you click the Track Analyzer button, the result appears.
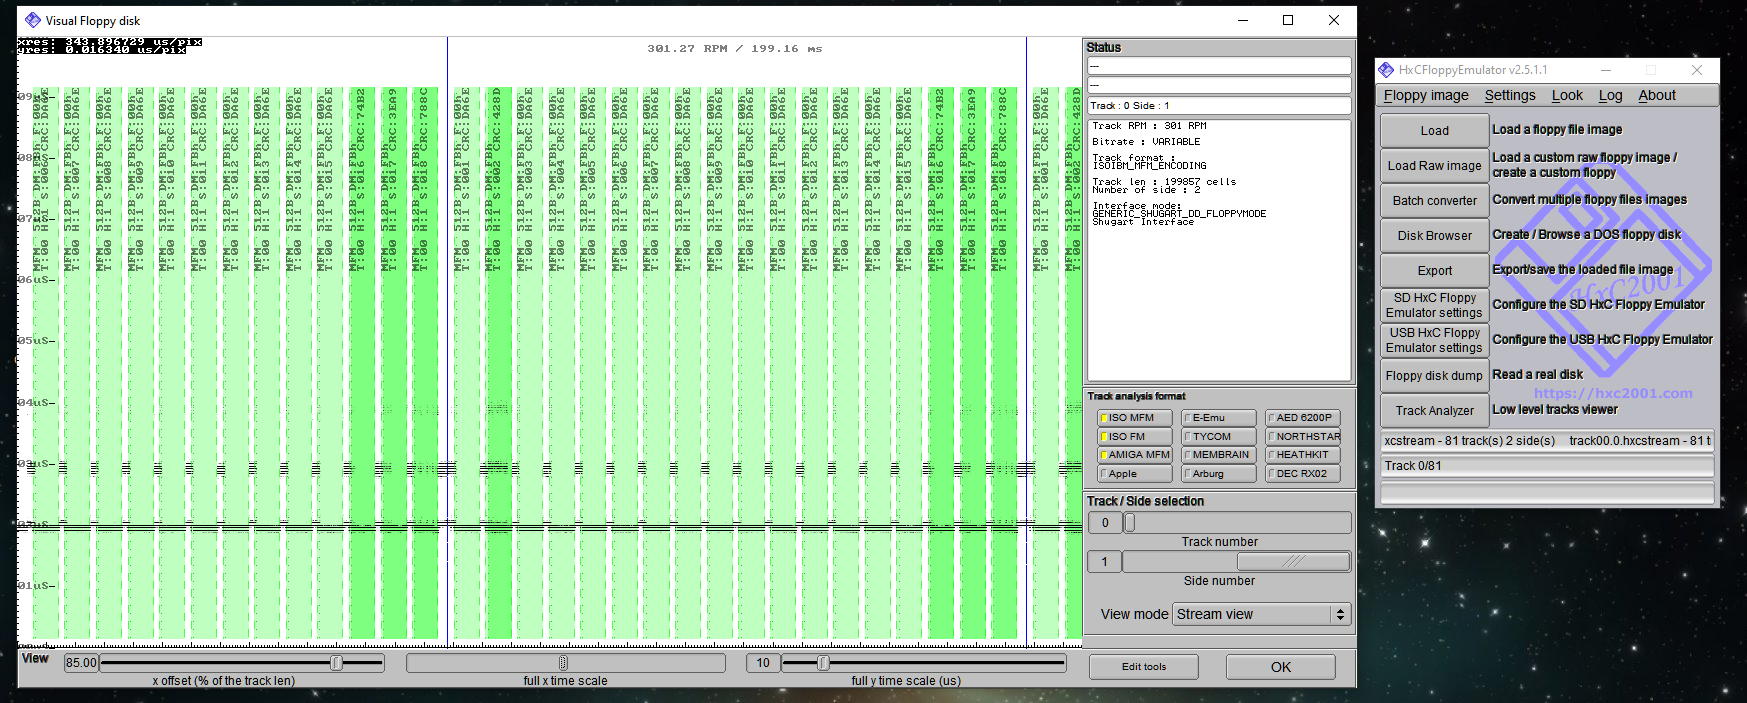
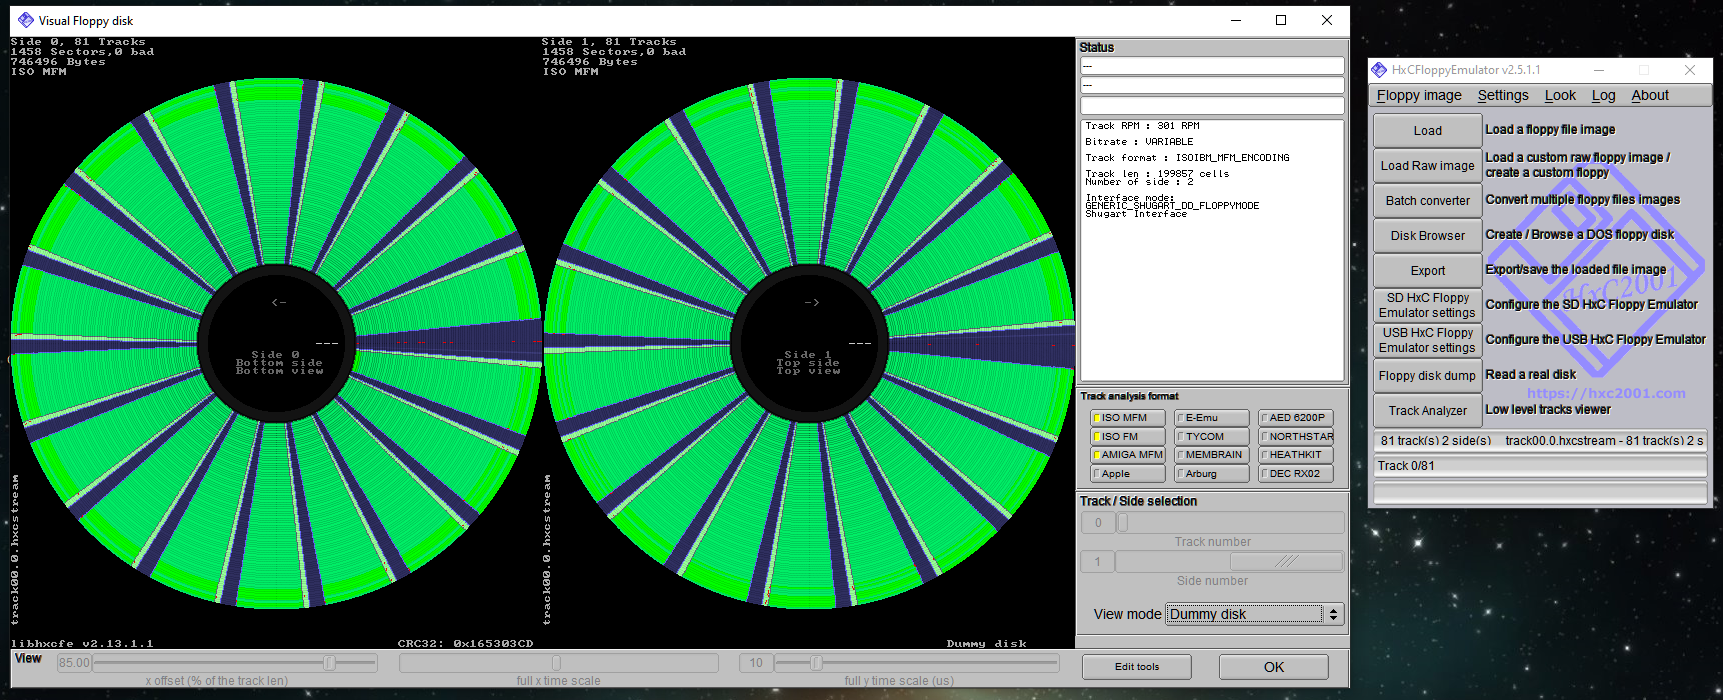
Some explanations of the information displayed here Forum torlus Understanding the visual floppy display
About us
DOCUMENT CREATED BY :
Philippe DUBOIS
Jean-Fred BRECHENMACHER
Fabien WERNLI
HARDWARE AND SOFTWARE DESIGN
Jean-François DEL NERO
https://hxc2001.com
https://sourceforge.net/projects/hxcfloppyemu/
Information about the associations
LA LUDOTHEQUE FRANCAISE
68 rue de Montreuil, 75011 Paris
contact@laludotheque.fr
https://www.laludotheque.fr
Discord : https://discord.gg/j5axxMK
MO5.COM
https://www.mo5.com/site
Discord : https://discord.gg/phG9zNk
Game Preservation Society
8-19-1-C Todoroki Setagaya-ku
Tokyo 158-0082, Japon
https://www.gamepres.org/fr